![Untitled design (1)-Aug-01-2022-12-37-27-80-PM.png]](https://help.syscloud.com/hs-fs/hubfs/Untitled%20design%20(1)-Aug-01-2022-12-37-27-80-PM.png?height=40&name=Untitled%20design%20(1)-Aug-01-2022-12-37-27-80-PM.png)
To grant more scopes to your Google Admin Console connection, you can follow one of the 2 options given below,
Phase 1 - EnableAPIs
Option 1: Enable all required APIs using Cloud Shell
This method enables all the required APIs by running a single script.
Before you begin
- Ensure that the correct Google Cloud project is selected.
- Copy the Project ID of the project.
- Ensure that your account has permission to enable APIs in the project.
Instructions
- Sign in to the Google Cloud console.
- Select the project you created for the SysCloud integration.
- Click the Activate Cloud Shell icon in the upper-right corner. Cloud Shell opens in a terminal at the bottom of the page.
- If an authorization prompt appears, click Authorize.
- Copy the following script into Cloud Shell and replace
your-project-idwith the Project ID copied earlier:
PROJECT_ID="your-project-id"
REQUIRED_APIS=(
admin.googleapis.com
chromepolicy.googleapis.com
chromemanagement.googleapis.com
cloudidentity.googleapis.com
drivelabels.googleapis.com
groupssettings.googleapis.com
licensing.googleapis.com
accesscontextmanager.googleapis.com
cloudresourcemanager.googleapis.com
iam.googleapis.com
iap.googleapis.com
)
echo "Google Cloud project: $PROJECT_ID"
echo "Enabling the APIs required for SysCloud Admin console backup..."
gcloud services enable "${REQUIRED_APIS[@]}" \
--project="$PROJECT_ID" \
--billing-project="$PROJECT_ID" \
&& echo "All required APIs have been enabled successfully." - Press Enter to run the script.
- Wait until the following message appears:
All required APIs have been enabled successfully.
The required APIs are now enabled. Continue to Phase 2: OAuth 2.0 consent screen configuration.
Note: The --billing-project option specifies the project against which quota and any applicable usage are recorded for this command. It does not create or link a new billing account.
Troubleshooting - If you receive a permission-denied error, contact your Google Cloud administrator and request permission to enable services in the selected project.
Option 2: Enable the APIs manually
Step 1: Sign in to Google Cloud Console using an admin account.
Step 2: Select the Google Cloud project where your OAuth app was created.
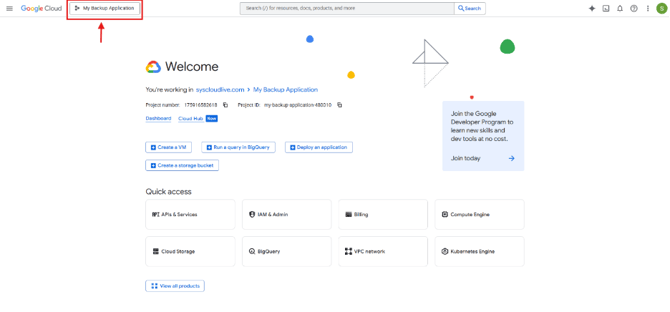
Step 3: Go to APIs & Services check if all the below APIs are enabled.
-
# API to enable Service name Why it is required 1 Admin SDK API admin.googleapis.comRequired for users, groups, organizational units, domains, roles, calendar resources, ChromeOS devices, mobile devices, user schemas, audit reports, and Chrome printers. 2 Chrome Policy API chromepolicy.googleapis.comRequired for ChromeOS and Chrome browser policy backup. 3 Chrome Management API chromemanagement.googleapis.comRequired for Chrome app details and Chrome management information. 4 Drive Labels API drivelabels.googleapis.comRequired for Google Drive admin labels metadata. 5 Groups Settings API groupssettings.googleapis.comRequired for Google Groups settings. 6 Enterprise License Manager API licensing.googleapis.comRequired for Google Workspace license information. 7 Access Context Manager API `` Required for Context Aware Access information. 8 Cloud Resource Manager API `` Required for Cloud Resource Manager information. 9 Identity and Access Management (IAM) API `` Required for Identity and Access Management (IAM) information. 10 Cloud Identity-Aware Proxy API `` Required for Cloud Identity-Aware Proxy information. 11 Cloud Identity API cloudidentity.googleapis.com
To enable, Cloud Identity API, Sometimes, it is not found in the API marketplace, hence go to the link mentioned below and select you project and click on 'Enable'.
Link - https://console.cloud.google.com/apis/library/cloudidentity.googleapis.com?project=YOUR_PROJECT_ID
Phase 2: OAuth 2.0 consent screen configuration.
Step 1: Go to API & Services -> Credentials
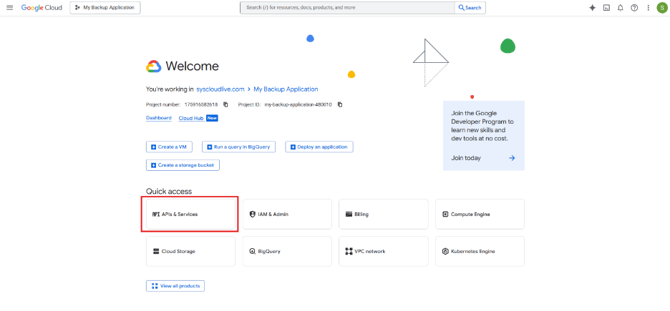
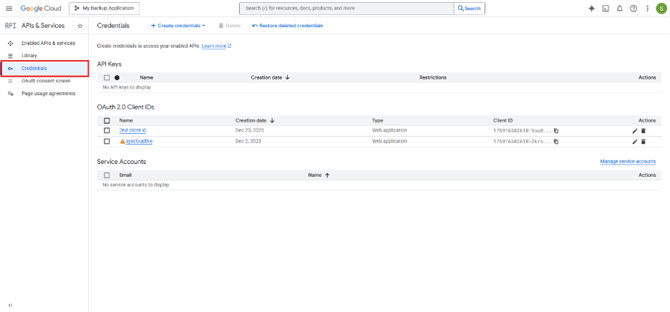
Step 2: Select the Client ID you want to update 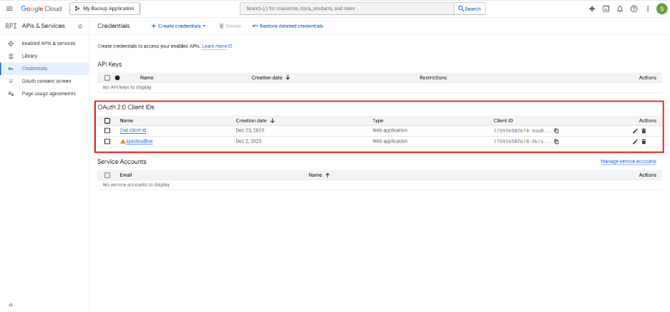
Step 3: Select the Data Access tab on the left panel and click Add or remove scopes.
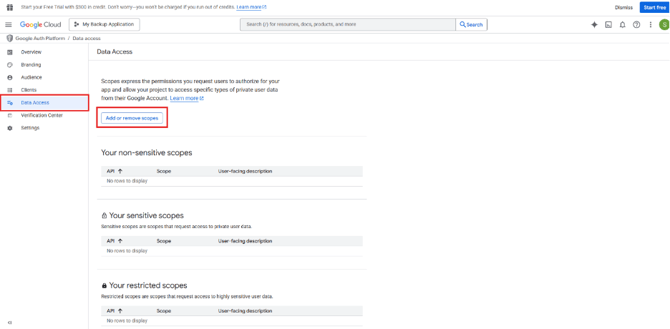
Step 4: Add the required Google Admin Console scopes (ensure all are selected), then click Update.
Add these scope URLs:
- https://www.googleapis.com/auth/admin.directory.user
- https://www.googleapis.com/auth/admin.directory.user.security
- https://www.googleapis.com/auth/admin.directory.group
- https://www.googleapis.com/auth/admin.directory.orgunit
- https://www.googleapis.com/auth/admin.directory.domain
- https://www.googleapis.com/auth/admin.directory.rolemanagement
- https://www.googleapis.com/auth/admin.directory.resource.calendar
- https://www.googleapis.com/auth/admin.directory.device.chromeos
- https://www.googleapis.com/auth/admin.directory.device.mobile
- https://www.googleapis.com/auth/admin.directory.device.mobile.action
- https://www.googleapis.com/auth/admin.directory.userschema
- https://www.googleapis.com/auth/admin.reports.audit.readonly
- https://www.googleapis.com/auth/chrome.management.policy
- https://www.googleapis.com/auth/admin.chrome.printers
- https://www.googleapis.com/auth/cloud-identity.userinvitations
- https://www.googleapis.com/auth/cloud-identity.groups
- https://www.googleapis.com/auth/cloud-identity.inboundsso
- https://www.googleapis.com/auth/cloud-identity.policies
- https://www.googleapis.com/auth/drive.admin.labels
- https://www.googleapis.com/auth/cloud-platform
- https://www.googleapis.com/auth/apps.groups.settings
- https://www.googleapis.com/auth/apps.licensing
- https://www.googleapis.com/auth/chrome.management.appdetails.readonly
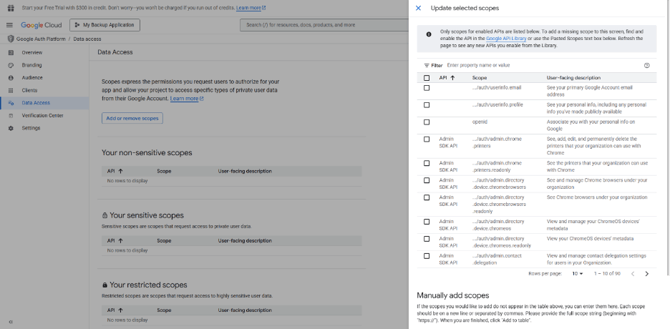
Step 5: Click Save and continue until the consent screen changes are saved.
Step 6: Get the client ID & client secret to re-authorize the application in SysCloud app.
If you do not have the client secret, please create a new secret by going to API & Services > Credentials. Choose the credential you used to authorize SysCloud connection and click on 'Add secret' to create a new secret.
Phase 3: Re-authentication
Step 1: Log in to SysCloud and go to Settings -> Cloud connection center. 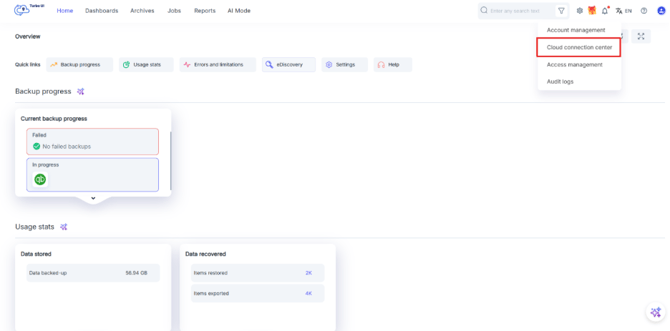
Step 2: Locate your Google Admin Console connection and click Edit (pencil icon) or open the connection details. 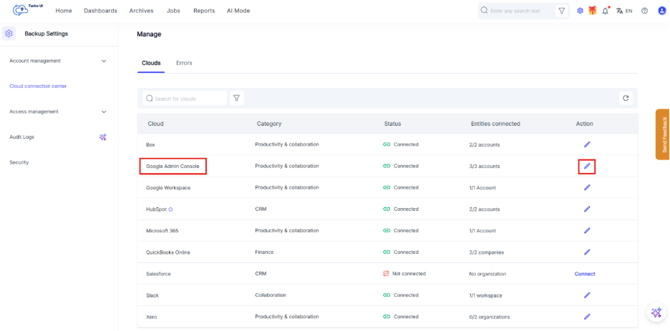
Step 3: Click Refresh Credentials and paste the new Client ID and Client Secret, then click Authorize in Google Admin Console . 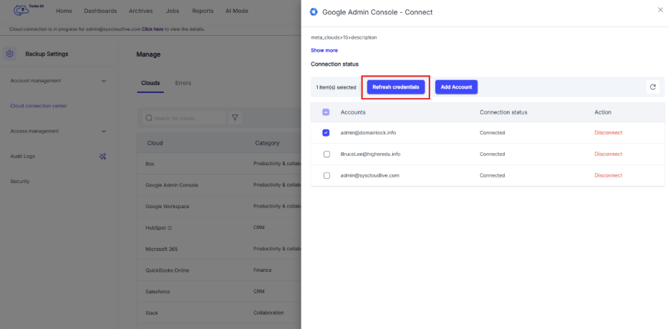
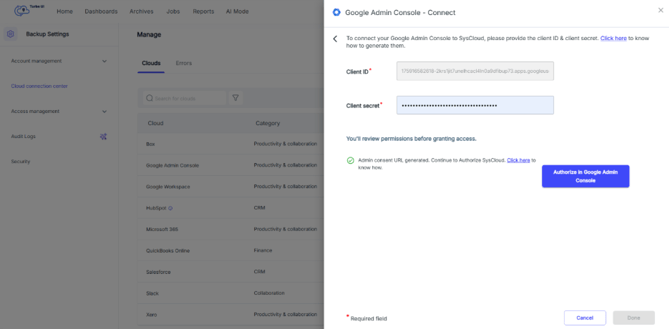
Step 4: Return to the backup status page and confirm the backup resumes in the next backup cycle.
If you have any question, please create a support ticket.